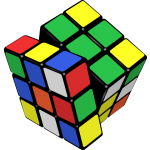
 I’ve had a fair number of accomplishments in my life. When thinking of them, however, It’s funny that learning to solve those colorfully-gridded cubes is one of the first things that comes to mind in contrast to maybe thinking about my education, my art, things I’ve built, places I’ve seen, trials I’ve endured and so forth. Rubik’s Cubes are simple “childrens’ toys”, a psychological assessment, and a pain in the ass rolled into one. They sell variations of the device that have up to 7 rows and you can even find cubes in the form of 50 cent key-chains at many, many stores. For the standard 3x3x3 six-color cube, there are 43 quintillion (43,252,003,274,489,856,000) possible combinations and how even the math to find this number is calculated is far beyond my means.
The cube, however, is not. Solving this puzzle means absolutely nothing, practically speaking, abstractly thinking, or other, and yet I derive pride from being able to do so consistently in under 3 minutes (paling in comparison to adult and children records of mere seconds). I did not learn on my own, rather, the sheer frustration of possessing one for a decade and never solving it drove me to finally seek help in accomplishing this task. It is quite possible to solve these damned things, and it can be done so with the help from a training website and practice. Basically, if you have the ability to memorize four 7-move sequences (and three mirror-versions), you can figure this thing out.
The gist of the process is as follows. Note that the first third of the cube doesn’t use patterns, but you must align the pieces manually. This is actually easier than it sounds. Another tip is that becoming accustomed to holding the cube with a certain Face pointed to the ceiling or floor will help orient you, especially if you have a brain fart in the middle of a sequence. On occasion, I’ve been able to reverse my incorrect moves, even though it is sometimes easier to start over.
1. Create a “cross” of one color at the Top of the cube. The Side pieces to the cross must match the middle colors on each Side they touch. Note that middle pieces on every Side never change orientation.
2. On that same Top color, fill in the “diagonals” to the “cross”. You do this by rotating the Sides once, then sliding the “diagonal” color in on the Bottom level, then rotating back up. If the color that should be on Top faces Down on the Bottom level, then you will have to do the mentioned move, then rotate a different Side, which corrects the alignment of the piece.
One Third of the cube is aligned.
3. From here on is where the sequences come in handy. Using the first site link’s terminology, D L D’ L’ D’ F’ D F (and it’s mirror) are all that is needed to get the Side pieces in place for the Middle Level. If the piece is already in place, but wrongly aligned, you just use the same combination to remove it. Repeat to each piece as necessary.
Two Thirds of the cube are aligned.
4. Flip the cube over, pointing what was at the Bottom towards the ceiling. There are only four different designs that are possible here. You want a “cross” shape. The three others are a single dot in the middle, a “hyphen” configuration, and a “half cross” shape. If you rotate the cube so that the “half cross” shape is in the top left corner, you may use the combo. All other shapes here don’t need to be rotated. Use the combo F R U R’ U’ F’ as many times as necessary until you have a “cross” shape with the Top color of the cube.
5. Now we are focusing on the Corner pieces of the Top Face. There are seven different orientation designs ranging from what looks like a “house” to a “fish” to two different versions of the cross, but with different Side facings. Don’t be overwhelmed. You’ll learn how they cycle through time, but for the time being, the combo R U R’ U R U2 R’ U2 will actually take you through each of the variations. The rotation of the cube is important here, as are the colors on the Sides of the pieces you are looking down on. Refer to the website for guidance. The final state before you have a solid color will be a fish facing the left-front corner, with the right-front color facing your body the same color as the completed Top color. A mirror version of the combo isn’t absolutely necessary here.
Two Thirds of the cube and the Top face are aligned.
6. If you ever hit a snag, this step is likely where it will happen. Look at the Sides of your cube. If you have one Top Level Side piece exactly where it needs to be, you are in luck. If not, perform R2 U F B’ R2 F’ B U R2 (or the mirror) once to get it to this state.
7. Now, with the correct Top Level Side piece facing away, you perform your previous combo from my step five: R U R’ U R U2 R’ U2 then perform it’s mirror after rotating the cube one time. That’s it! You should have a completed cube!
By comparison, a typical phone number has 10 digits in it. These four combos are 6-9 digits. To recap, the combinations used are:
1. D L D’ L’ D’ F’ D F (has a mirror)
2. F R U R’ U’ F’
3. R U R’ U R U2 R’ U2 (has a mirror)
4. R2 U F B’ R2 F’ B U R2 (has a mirror)
My advice is simple: Don’t get discouraged. The whole process boils down to recognizing what block needs to go where, at which point you initiate one of the four sequences. With practice, you may even find that your hands might eventually memorize the movements, needing only to view the cube in between phases. And of course, if you want to be an asshole about it, you may one day be able to do the remaining two sequences behind your back, the 16 move process clicking impressively while you smile at an audience. If you get too cocky, bored even, try learning the more complicated and speedy maneuvers of Expert Tutorials. Personally, I never got that far….
Rubik’s Cube Training Site: http://peter.stillhq.com/jasmine/rubikscubesolution.html
An Alternate Take On It: http://www.rubiks.com/

